

Showing posts with label photo retouching. Show all posts
Showing posts with label photo retouching. Show all posts
Sunday, October 6, 2013
Tuesday, March 19, 2013
Oat Cakes
This is attempt number one in what will be a series of attempts to define a new approach for my photography. Taking a photo and carefully massaging it to have a more illustrated or painted quality to it. There is no magic Photoshop filter to achieve this. A bold new frontier in pixel bending (probably not though, I'm sure someone else has done it already or at least something similar). Since Photoshop CS2 is free from Adobe and I was too lazy to go downstairs to the mac, this was all accomplished in that super old Photoshop environment on PC laptop that does not have a calibrated monitor. I'm friggin living on the edge here folks.
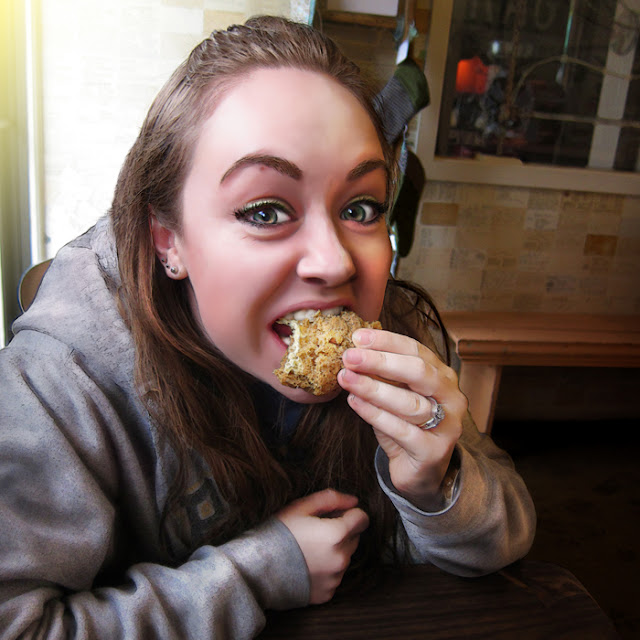
I feel like the technique can probably be pushed quite a bit farther, but I'm pretty comfortable with this first attempt. More to come as this approach evolves.
Saturday, October 27, 2012
Senior Picture Project 2012: Part 2
Photos capture by Annette Jarnig.
The purpose of this project is to hook up some Highschool seniors with quality pictures that their families wouldn't have been able to afford otherwise. It has become a goofy standard in American culture to spend hundreds to thousands of hard earned dollars on Senior pictures. Not everyone can pull this off, but everyone deserves to have amazing pictures to be able to swap with the kids they have spent their entire educational career growing up along side.
Click to here to see Part 1.
Shown below, the final product. Mouse over the image to see the before (may take a moment to load).
Senior Picture Project 2012: Part 2
Photos capture by Annette Jarnig.
The purpose of this project is to hook up some Highschool seniors with quality pictures that their families wouldn't have been able to afford otherwise. It has become a goofy standard in American culture to spend hundreds to thousands of hard earned dollars on Senior pictures. Not everyone can pull this off, but everyone deserves to have amazing pictures to be able to swap with the kids they have spent their entire educational career growing up along side.
Click to here to see Part 1.
Shown below, the final product. Mouse over the image to see the before (may take a moment to load).
Sunday, October 21, 2012
Senior Picture Project 2012: Part 1
Photos capture by Annette Jarnig.
The purpose of this project is to hook up some Highschool seniors with quality pictures that their families wouldn't have been able to afford otherwise. It has become a goofy standard in American culture to spend hundreds to thousands of hard earned dollars on Senior pictures. Not everyone can pull this off, but everyone deserves to have amazing pictures to be able to swap with the kids they have spent their entire educational career growing up along side.
Shown below, the final product. Mouse over the image to see the before (may take a moment to load).
Tuesday, September 11, 2012

Monday, September 3, 2012

Monday, August 20, 2012
Cosplay Bonanza: Memory Versus Reality
The beauty of photoshoppery is the ability to make a digitally captured moment look exactly how you remember it, make the colors and mood just as vivid as it actually seemed. Digital devices lack the ability to truly capture what the human eye does let alone capture the awe of the moment. Here is a more in depth view of one of the shots pictured from last weeks post as I remember it versus how the moment actually captured.
[mouse over to see original capture]

Hardest part about shooting at a convention is that there are tons of people that get in the way and the back drop is a convention center... which is about the dullest backdrop possible. A plethora of wall mounted visual distractions and photo bombers. Two big background distractions that I was oblivious to when I snapped this shot was the mildly disgruntled man sitting up against the wall and the gray wall panel.
Of these Mass Effect cosplayers, the girl in blue on the right was the most impressive. The costume is well done, tons of amazing detail. When I looked at the original in detail after getting home from the convention, I noticed some things (aside from the background distractions) that detracted from my memory of the moment. The girl after a long day at the con had some of her makeup beginning to wear off, the headpiece was starting to come a bit undone, and her bra was sticking out a bit. This is the reality of the moment, but wasn't true to my memory and initial impression of the moment. A true naturalist would have left it as it was and could even argue that by "fixing it" I destroyed the original integrity of the moment... Ultimately, I can live with this since I was able to recapture the moment as I remembered it.
[mouse over to see original capture]
Hardest part about shooting at a convention is that there are tons of people that get in the way and the back drop is a convention center... which is about the dullest backdrop possible. A plethora of wall mounted visual distractions and photo bombers. Two big background distractions that I was oblivious to when I snapped this shot was the mildly disgruntled man sitting up against the wall and the gray wall panel.
Of these Mass Effect cosplayers, the girl in blue on the right was the most impressive. The costume is well done, tons of amazing detail. When I looked at the original in detail after getting home from the convention, I noticed some things (aside from the background distractions) that detracted from my memory of the moment. The girl after a long day at the con had some of her makeup beginning to wear off, the headpiece was starting to come a bit undone, and her bra was sticking out a bit. This is the reality of the moment, but wasn't true to my memory and initial impression of the moment. A true naturalist would have left it as it was and could even argue that by "fixing it" I destroyed the original integrity of the moment... Ultimately, I can live with this since I was able to recapture the moment as I remembered it.
Sunday, August 12, 2012
Cosplay Bonanza!
Any convention with cosplayers is an opportunity for guerilla photography. Tons of people running around in carefully crafted costumes that are anxious to show them off. If you are holding a camera all you need to do is make eye contact and they stop and pose. With GenCon 2012 right around the corner, I've been looking back on some of the shots I got last year..
One big issue I've had in the past was with there being multiple visual points of distraction that wound up in each shot. Still being quite the photography noob at this point (2011), my focus was just getting a good shot and not considering techniques I could have used to put more focus on my subject. So, I cleaned up in post. Even with all of the best intentions, a shot can still turn out less than ideal due to people getting in the way. Next post, I'll go into some detail on how I corrected some of these distractions and what my approach was. For now, enjoy a smattering of my favorite shots from GenCon 2011:


One big issue I've had in the past was with there being multiple visual points of distraction that wound up in each shot. Still being quite the photography noob at this point (2011), my focus was just getting a good shot and not considering techniques I could have used to put more focus on my subject. So, I cleaned up in post. Even with all of the best intentions, a shot can still turn out less than ideal due to people getting in the way. Next post, I'll go into some detail on how I corrected some of these distractions and what my approach was. For now, enjoy a smattering of my favorite shots from GenCon 2011:
Tuesday, July 24, 2012
That would be a cool shot but...
...the lighting is awful, there is a bunch of crap in the way, these people won't move, I can't get the angle I really want... We have all been there. Sure, it's easy to get shots out in the wilderness or in remote areas, time and space are on your side. What to do if conditions are not ideal and there is minimal time to make adjustments? Start shooting what you can and clean up in post. This is the beauty of shooting in camera RAW.
The downsides to camera RAW: larger file size and the images need to be converted. That's it. It's too powerful not to use. Via Photoshop's camera RAW editor, you have full control over your shots as if you were developing the film yourself in a dark room and then some. Whether you realize it or not, all cameras capture initially in RAW format then will typically convert to a JPEG on the fly. This is all fine and good except that you immediately sacrifice quality and color information.
I was at Adepticon (an amazing war gaming convention in Illinois) this last spring and there was a display case set up for a model painting contest hosted by coolminiornot.com. The entrants models were all lined up in the case just begging to be photographed. I swooped in for the kill.. and so did about 20 other people. I was able to get set up for the first shot, but as people were elbowing one another and taking up space, I was just trying to get the shots as I could. There was a lot to see at the convention so rather then spending the time setting up the white balance for each shot, I just kept moving on.
I was able to get the shots I wanted, but the conditions were far from ideal. I took the images into the Photoshop camera RAW editor and was able to through a few adjustment sliders, correct for all the things I couldn't compensate for in the heat of a very crowded nerdy moment. Couple that with some simple object removal in PS and I was able to walk away with some great shots of some amazing artwork.
[mouse over the images to see the shots before adjustments]
Saturday, July 21, 2012
First Wedding Shoot
This summer I assisted with a wedding shoot (my first time working at a wedding), and of course the day began with Murphy's Law in full effect... Some background first..
My Aunt got us the job and set up the equipment rental, she is the "boss" of our operation and I am proud to be her assistant. She brings an artistic eye and a rich past of photography experience to the table. She is the networker of our duo. I handle backup shooting, lighting, and post production magic. Together we are quite a formidable team.
The day of the job we went to a local camera rental store to pick up some equipment we had a hold on. Upon arrival, they inform us that we need a credit card with a limit that can cover the full cost of all the equipment just incase it breaks or we steal it. Neither of us carry credit cards so we were left there, jaws on the ground stranded. My Aunt has a DSLR, so we weren't without one big gun, but I only had my s95 on hand. Takes great shots if the lighting is right, but is no replacement for the D70 that we had on reserve.. We quickly rallied, adjusted out game plan, and charged forth determined to get the best goddamned shots we could... AND SO WE DID!
So here is a sampling of two shots from the event. Both of these photos are great examples of what can be done in post when you have a very specific idea in mind but the even and situation don't allow for you to create your vision with the raw capture.
This first shot was taken before the ceremony began in the dressing room. The lighting wasn't ideal, the quarters were close, and the natural daylight was not playing nicely. Pictured below is the final shot after some Photoshopery (never underestimate the awesome power of the Shadow/Highlight adjustment in PS, it can save an image that seems to be lost due to under/over lighting). The face was lightened, details were enhanced, contrasted boosted, and finally the image was moved to grayscale.
[mouse over to see original]
Any obnoxious or visually distracting objects will get removed from an image if I see fit for these types of pictures, especially if they are for a client and it is for a memorable occasion. I feel it is important to try and keep the capture as close to the raw photo as possible and not alter the appearance of people (especially faces) any more than necessary. I've seen a few studios that drop all the wedding photos on some god awful Photoshop Plug-In that putty faces everyone and filters the crap out of an image so it doesn't even look like a true capture of that moment in time anymore (aka that soft lighting effect that is all the rage these days..). I avoid this at all costs.. that being said, if a client pushes for it, they are paying and I will do it. BUT. I will try and talk them out of it first. Too much beauty in the true capture of the moment. Moving on...
This next shot captured pretty close to what we had in mind for the shot. A silhouette of the bride and groom starring lovingly at one another in front of a lavishly decorated window. However, the original capture wasn't dark enough where I wanted it even though the outside captured right where I wanted it. There was also a car in the background and some ugly reflections in the window. Those were removed before converting to grayscale so that the composition had better flow and wasn't as distracting.
[mouse over to see original]
All in all, the shoot went amazing. I can honestly say after this experience, it was more exhausting working a wedding as a photographer than it was being the groom at my own wedding. Despite that, I look forward to the next job. It's a unique experience to spend a day getting to know two strangers and observing them with their families. This group was great and made this first time doing this kind of work a breeze.
Here's to hoping the next job goes as smoothly!
Here's to hoping the next job goes as smoothly!
Wednesday, July 18, 2012
Long weekend in the U.P.
I don't travel nearly enough, but I do get out from time to time. Setting for these shots: Michigan's Upper Peninsula. It's remote, everything smells like pine trees, and it's quiet. Spent a long weekend fishing and driving around. It was nothing short of intensely restful.
Some additional info about the shots.. I'm currently equipped with a Cannon PowerShot s95, which is an awesome point and shoot camera. It allows for full manual control and the ability to shoot in RAW while still fitting in my pocket. It preforms the best when lighting is ideal, the flash is adequate but is far from ideal. The sky and rain shots were taken using the camera's manual mode with the following settings:
Exposure 1/1000 | Aperture f/6.3 | ISO Speed 80
For most other shots I will shoot in the camera's "Auto" mode, which in my opinion does a great job. I'm not proficient enough or confident enough to shoot in full manual all the time. I would rather make sure I get the shot I want using "Auto" and clean up in post than miss it and have nothing but a soon to fade memory. [all shots had contrast and sharpness boosted in post using Photoshop]


Subscribe to:
Posts (Atom)